When we measure something, we are finding in standard units some property of that object or system. An error is the difference between our measured value and the true value of that property. Mathematically, we can express this difference as:
- Error = measured value – true value
In measurement, no measuring device can absolutely measure something without an error. More so people are likely to vary slightly when asked to read values from measuring devices with numbered scales. Because of this, there are two kinds of numbers associated with reporting measurements. These numbers are called exact and inexact. Exact numbers are definitions. Because they are definitions, they are certain and have infinite number of significant digits. An example of a definition is that we have 7 days in 1 week. Another example is that we have 60 seconds in 1 minute. As you can tell, 7 days and 60 seconds are certain and so are called exact numbers. On the other hand, inexact numbers are measured values. Because they are measured values, they are uncertain to some extent. As an example, let’s say you measured the length of your book using a ruler and reported a value of 20.5 cm. Because 20.5 cm is a measured value, it is called an inexact number, and it is uncertain in the last digit, .5. As a result, we can say that since inexact numbers are measured values, they are affected by systematic and random errors.
Here is a diagram showing this relationship:

What are systematic errors?
When you take a set of measurements, systematic error is an error that’s constant throughout the set. For example, if our weighing scale is off by 2 pounds, our weight will also be off by 2 pounds. From this, we can say that systematic errors are reproducible. And because they are reproducible, they are usually tied to the instrument or experimental design. For this reason, systematic errors can easily be detected and eliminated.
To eliminate systematic error, we must carefully design our experiments, ensure our measuring devices are well calibrated and strictly follow their required operating procedures. For example, if we want to check the accuracy of our weighing scale, we will weigh an object of known mass to see whether it will give us the exact same mass. If it does, then it’s working great. If it doesn’t, then it’s faulty and should be repaired or replaced.
What are random errors?
When you take a set of measurements, random error is an error that varies at random from one value to the next in the set. Sources of random error include vibrations, air currents, variations in temperature and misreading numbered scales by people. Random errors are usually difficult to discover and control. Because of this, we are often asked during some experiments in general chemistry to take repeated measurements of the same object and then calculate the average. The average is always a reasonable estimate of the true value when systematic errors are absent in the measurement. And you can determine the scatter around the average by calculating the standard deviation.
How can we judge the quality of measurement?
We can judge the quality of measurement by what we call precision and accuracy.
What is precision?
When you take repeated measurements of the same property, precision is how close your measured values agree with one another. For example, let’s say you measured the diameter of a gold coin three times and reported the following values: 2.50 cm, 2.49 cm, 2.48 cm.
Since the values are close to one another, we can say that you are precise.
What is accuracy?
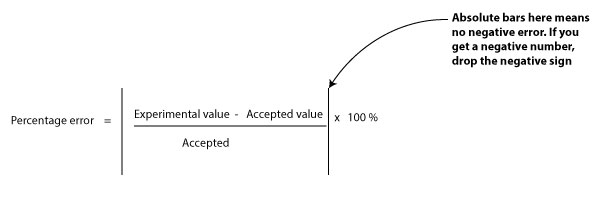
Accuracy is a measure of how close your measured value is to the true value. The closer your value is to the true value, the better. Usually, you can calculate your percentage error by using the following formula:

From the formula, the higher the percentage error, the greater the sign that your measuring device is faulty, or a sign that you may have committed an error during your experiment or calculation.
How can we keep track of error when doing numeric chemistry problems? To learn more about this, click here.